docs / learn / walkthroughs
Screenshot walkthroughs
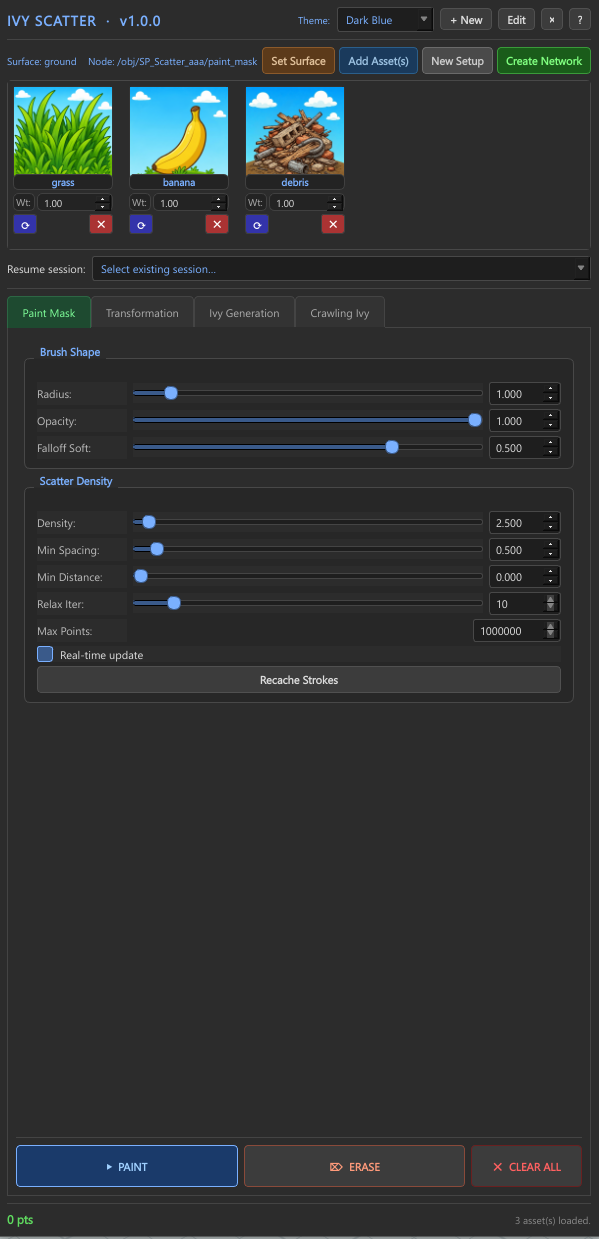
Each panel of Ivy Scatter, annotated. Numbered pins on the screenshot match numbered notes on the right — read top to bottom, follow the dots. When you see a region in the live tool, find its number here and you'll know what it does.
How to read these. Open the HDA in one window, this page in another. When something on screen confuses you, locate the same region in the screenshot below, then read the matching numbered note. The notes describe both what the control is and what to do with it.
The Ivy Scatter panel
1
2
3
4
5
6
7
8
9
Header, asset tray, parameters, footer
1
Wordmark & version. Confirms the HDA loaded. If this reads anything other than
v1.0.0, you're on a different release — check the changelog.2
Theme picker. Defaults to "Dark Blue." Other themes are cosmetic; everything else in this guide assumes Dark Blue.
3
Surface tools. Set the geometry to paint on, add scatter assets, start a fresh setup, or commit the network.
Set Surface is amber until a surface is set, then turns slate-blue.4
Asset tray. Each card is a scatterable mesh — name, weight, eye toggle, delete. The colored frame is sampled from the asset's dominant hue so you can read the tray at a glance.
5
Resume session. Picks an existing paint session. Useful when you've stopped mid-paint and want to come back the next day.
6
Tab bar. Four parameter pages — Paint Mask, Transformation, Ivy Generation, Crawling Ivy. The active tab has a green underline.
7
Brush Shape. Three knobs that shape your paint stroke:
Radius (size), Opacity (per-stroke strength), Falloff Soft (edge feathering).8
Numeric field. Drag vertically to scrub, or click to type. Values are 3-decimal floats unless they're integers (
Relax Iter, Max Points).9
Action footer.
▶ PAINT enters paint mode (drag in viewport). ⊘ ERASE wipes painted areas. ✕ CLEAR ALL resets the whole mask.What to do when…
Quick reference for the moments people get stuck:
A
"Set Surface" is orange/amber. No surface is set. Select geometry in the viewport, then click the button. It turns slate-blue once accepted.
B
"PAINT" doesn't do anything. You probably haven't set a surface yet (see A) or every asset is hidden (eye toggles in the asset tray). The bottom-right counter will say
0 asset(s) loaded. if so.C
The scatter looks too dense. Lower
Density (Scatter Density section). If you still see clumping, raise Min Spacing and Min Distance, then click Recache Strokes.D
Sliders won't update the scatter live. Tick
Real-time update in Scatter Density, OR keep it off (faster) and hit Recache Strokes when you want to see the effect.E
The bottom counter says 0 pts. Painting hasn't deposited any points. Check that you're in paint mode (the
▶ PAINT button is highlighted/pressed) and that Opacity is above zero.F
I can't undo a paint stroke. Use
⊘ ERASE with the same brush settings, OR ✕ CLEAR ALL to nuke the entire mask and start over.